Tag Archives: plotting method

Plotting a novel with a beat board

This entry is part 23 of 24 in the series The plot thickens (Mwahahaha)

Our series on plotting is a perennial favorite on the blog, so we’re expanding on that series with a few guest posts! Ali introduced me to Save The Cat! and I really loved using it on my most recent manuscript, so she’s here this week to explain the basics of this plotting method and how to use a beat board.

By Ali Cross
Used with permission from this post

I use a corkboard, (but you can use a wall, or whatever) and a stack of index cards (or sticky notes). My crit group just gave me a new package of index cards–they know me so well! Thanks guys! 

Don’t freak out over the size or color of your cards. Just use whatever. You can use colored pens if you want (I usually only use colored pens if I’m beating out a story with multiple points of view–each main character gets their own color.)

Now, using a couple strips of masking tape, divide your corkboard (or whatever) into four even sections (three strips of tape.) This denotes Act I, Act II part one, Act II part two, Act III.

It should look like this:

ACT I
ACT II part one
ACT II part two
ACT III

Now, get out your beat sheet and your index cards.

On your first card, jot down your notes for the Opening Image. Tack it/tape it/whatever right at the beginning of your Act I section.

Your next card is #6 on the Beat Sheet; the Break into Two card. Place it at the very end of the Act I section.

Next, #7, B Story, at the beginning of the Act II, part one, followed by #9, Midpoint, at the end of that section.

#10, Bad Guys Close In, goes at the beginning of the second Act II, followed by #13, Break Into Three.

Your last section starts with #14, Finale, and finishes with #15, Closing Image.

Now, fill out your cards for the remaining beats and tack them to your board where they belong. You’ve probably got some scenes in your head, so jot them down on a card and figure out where they belong. Your beat sheet should give you a pretty clear idea where it goes on the storyboard. Go ahead and stick your cards up there.

Action scenes, or beats that involve multiple scenes to play out, get stuck to the board in cascading groups. You can see what I mean in the photo of my board:

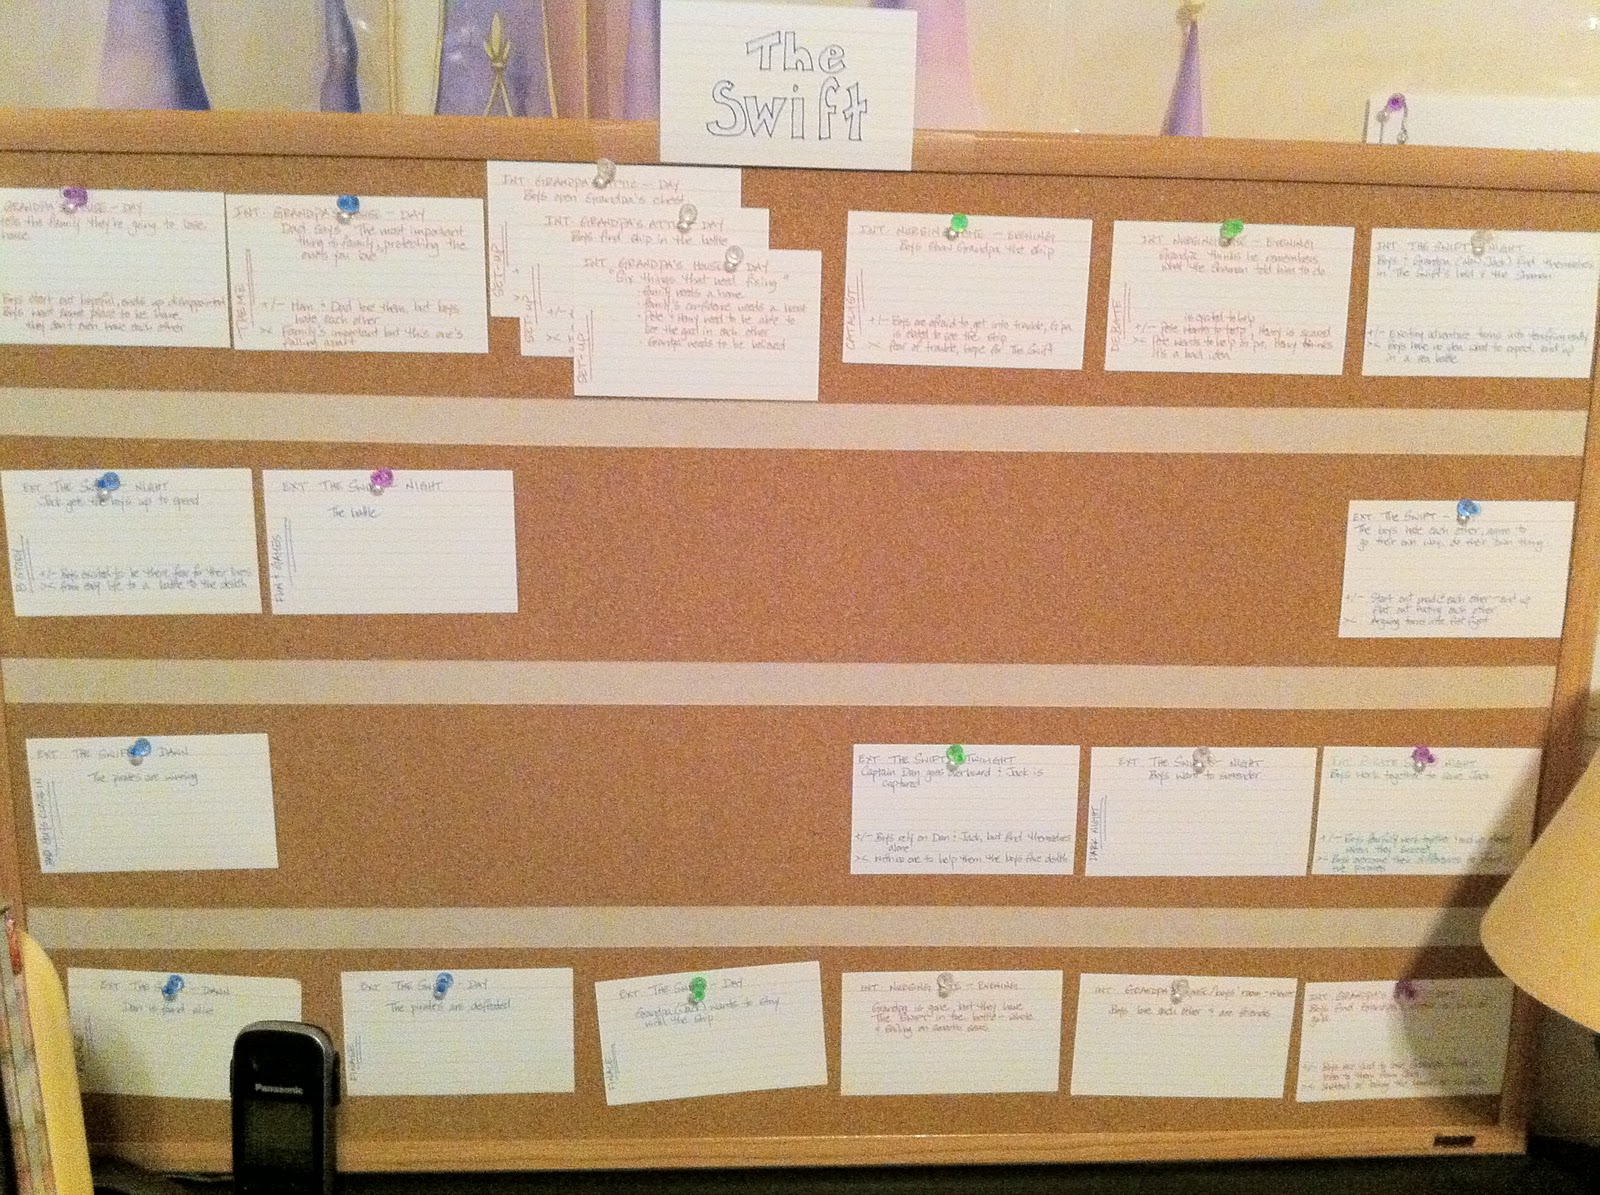
It’s easy to see where the holes are, but I’m not worried. In fact, I’m kind of happy about it. This outline keeps me in line by pinning down the beginning, middle and end, but allows me the freedom to work out all that fun middle stuff.

If I get an idea for a scene I can write some notes on it and add it where it belongs. That way, I’ll know exactly where to add that scene once I catch up to it. And when I’m sitting there, all out of Mike ‘n Ikes, my mouth hanging open as my gears try to get the writing going, I can look at the board and know what I’m supposed to work on next.

Whew! That was a lot of info! If you have any questions, feel free to ask them in the comments and I’ll do my best to answer in there. 

About the author

Ali Cross is the sensei of the writer’s dojo where she holds a black belt in awesome. She lives in Utah with her kickin’ husband, two sparring sons, one ninja cat, two sumo dogs and four zen turtles.

She’s the author the young adult urban fantasy series Desolation, and a member of the Author’s Incognito Executive Committee.
Blog Facebook Twitter

Blake Snyder’s Save the Cat plotting method

This entry is part 22 of 24 in the series The plot thickens (Mwahahaha)

Planning out a novel? Be sure to join my newsletter for a FREE plotting/revision roadmap, and check out the full series on plotting novels in a free PDF!

Our series on plotting is a perennial favorite on the blog, so we’re expanding on that series with a few guest posts! Ali introduced me to Save The Cat! and I really loved using it on my most recent manuscript, so she’s here this week to explain the basics of his plotting method.

By Ali Cross
Used with permission from this post

A couple weeks ago I posted some pictures of my office, including a pic of my new “beat board”.


Several of you asked me to explain what this is and how I use it. I’m borrowing heavily from a post I did pre-NaNo 2011, so some of you will have heard this before. But for those of you who are new to the wonder of Beat Boards, strap in and let’s go!

I am completely gaga over the screenwriting book, Save The Cat. If you haven’t read it yet, I completely, 100%, highly recommend it. In the meantime, here are the highlights as they apply to me and how I write a novel.


Using the document below I fill in a sentence or two that addresses that “beat” or plot point (I’ve also included a question that helps me in this task). You can go here to get a fantastic beat-by-beat breakdown of where these beats should land in your manuscript, depending on the anticipated length of your novel.

THE BLAKE SNYDER BEAT
If you’d like more information, there’s lots to learn on Blake Snyder’s website

PROJECT TITLE:
GENRE:
DATE:

1.Opening Image: Set the scene. Who is/are your main character(s) and what is their world like before your story begins?

2.Theme Stated: What will your character’s arc be? What is the moral of your story? Usually the theme is stated by a supporting character. What is the moral of your story?

3.Set-up: Pretty self-explanatory, right? This is where all the pieces are put into play. Who are the main players and where is your story set?

4.Catalyst: Again, you know this one. A chain of events that set things into motion. What happens to change your main character’s world?

5.Debate: This is where your MC has to make some decisions about what he’s going to do. What choices does your main character have to make?

6.Break in to Two: The transition from static MC to MC on the move. What new adventure is your character on?

7.B Story: This is where you move into the second act of your story, or, the dreaded middle section. (duh duh duhhhh) It’s usually the B story, or the love story, or the big action/adventure story of your book. What is the new relationship in your main character’s life?

8.Fun and Games: Pretty much more of all the love, the action or … whatever! (Yeah, you can tell I love mid-sections!) What kind of trouble does the main character get into?

9.Midpoint: This is like a mini act-break. It’s the corner you turn toward the second half of your book, like your MC is standing on a cliff and needs to decide: fight or flight? What happens to make the character think everything is awesome or everything is awful?

10.Bad Guys Close In: Your MC hasn’t jumped, but the bad guys are almost there and …. maybe there’s still time to jump! What stands between your characters and what they want?

11.All is Lost: It looks like the Bad Guys are going to win. Sad. πŸ™ What happens to make your character think they’re not going to get what they want?

12. Dark Night of the Soul: Your MC has to decide if he’s just going to give in, or if there’s still some fight left in him. Why does your character consider giving up?

13.Break into Three: Another all-important corner. This is where the MC makes his DECISION. And we being our movement forward with purpose. What does the character do to make a last ditch effort to get what they want?

14.Finale: Wrap up the B story, wrap up the A story. What does your main character do to turn things around?

15. Final Image: Usually a mirror image of the opening scene. This shows us how the MC’s life has changed, how the theme played out and how all the questions you posed are answered. What is your character and their world like now that their adventure is over?

Yes these are overly simplistic, but you get the point. Answer these questions, get these “beats” straight in your head and ta da! You now have all the building blocks necessary to get to work on your manuscript.

Next time: how to use the the beat board . . .

What do you think? Have you read Save the Cat? Come join in the discussion!

About the author

Ali Cross is the sensei of the writer’s dojo where she holds a black belt in awesome. She lives in Utah with her kickin’ husband, two sparring sons, one ninja cat, two sumo dogs and four zen turtles.

She’s the author the young adult urban fantasy series Desolation, and a member of the Author’s Incognito Executive Committee.
Blog Facebook Twitter

A ten-step snowflake versus a five-step star: Organizing a manuscript my way

This entry is part 9 of 24 in the series The plot thickens (Mwahahaha)

Planning out a novel? Be sure to join my newsletter for a FREE plotting/revision roadmap, and check out the full series on plotting novels in a free PDF!

by Carol J. Garvin

If you were to ask, my family would tell you I have a thing for snowflakes. Childhood efforts to catch and melt them on my tongue evolved into a slightly out-of-control adult passion to amass the ultimate collection including jewelry, embroidered fabrics, candles and other home accessories. Every December we dangle giant snowflakes in our windows instead of wreaths and display a tree decorated entirely with a variety of snowflakes set aglow by tiny white twinkle lights.

It isn’t surprising, therefore, that the idea of a “snowflake” method of writing would appeal to me. Of course, if you’ve read any of my whining about outlines and plotting you might guess that I’d grasp at anything likely to improve my odds of producing a more organized manuscript.

I’ve never liked being tied to an outline so when Randy Ingermanson’s recommended Ten Steps of Design appeared to offer a less rigid approach I gave it a try.

KochFlakeThe first step in the Snowflake approach required getting the essence of my story condensed into one sentence—always a challenge but something I was going to have to do sooner or later to answer the always-dreaded, β€œWhat’s your novel about?” question. The second step was to expand that one sentence into a short paragraph—once again a useful exercise that could later form the basis of a synopsis. I shirked somewhat on the third step that called for a full-page summary sheet for each of my characters and instead created summary paragraphs.

At this point my good intentions balked. The remaining steps had me spending too much time repeatedly going over the same ground in an effort to record information that I hadn’t yet created. I wasn’t developing a snowflake design so much as creating a daisy pattern, each step causing me to return to the centre fulcrum and trace ever-increasing loops.

All this building on the basics was meant to leave me with the story virtually complete and thus simplify the writing process. The theory is sound but for me it had the effect of capping the fountain of creativity and dragging me to a standstill.

I didn’t cease writing permanently, of course. I examined what had been working and analyzed why it no longer was. Just as Jordan suggested in her post on story architecture. I learned that what I need is to have a basic plan in place but with reassurance that I’m not locked into following its every detail. I need more flexibility than the true Snowflake Method allows. As a result, I adapted the steps for an abbreviated approach that helps create my initial building blocks and then keeps track of scenes and chapter content as I write.

If I have to backtrack occasionally to accommodate a new character or scene, that’s okay but usually I write straight through to the conclusion of a bare bones first draft. As I review and revise I add a succession of new layers of description and detail to flesh out the story, setting and characters.

Since I skip half the steps, what I’m doing doesn’t represent the true Snowflake Method but only a vague version of it. It has just five points (kind of like a star rather than a snowflake):

  1. Create a one-sentence summary of the story.
  2. Expand the one sentence into a paragraph that outlines the story basics.
  3. Expand the paragraph into a page or two that introduces the main characters, the conflict, complications, and resolution. Include how the MC will change throughout the story (i.e., intended character arc).
  4. Create a spreadsheet into which highlights of each chapter’s action will be inserted as the first draft is written.
  5. Revise draft, adding details and description to enrich the writing.

I could be criticized for taking shortcuts and not giving the Snowflake Method a fair try but I’ve already admitted I need flexibility. My commitment to begin with that method didn’t extend to any kind of promise that I would stay with it. I truly believe each novelist must approach story building via whatever method works, however unique it might be. There is no one right way that will suit everyone. The only way to guarantee the successful completion of a novel is to keep writing and the smart novelist utilizes whatever tools it takes to reach that goal.

About the author
Carol J. Garvin, blogging at Careann’s Musings, is a freelance writer with articles in various Canadian magazines and publications. She lives in southwestern British Columbia and is a member of the Federation of BC Writers and the Langley Writers’ Guild. She has written a family memoir that is not meant for publication, and began writing novels ten years ago. She is on her third but so far none are ready to send out into the world quite yet . . . but soon. Besides writing, her other passions are her church and family, gardening, reading, music, painting and purebred dogs.

A quick look at the Snowflake Method

This entry is part 8 of 24 in the series The plot thickens (Mwahahaha)

Planning out a novel? Be sure to join my newsletter for a FREE plotting/revision roadmap, and check out the full series on plotting novels in a free PDF!

The Snowflake Method is the second plotting method we’re going to look at. Well, creator Randy Ingermanson might not call is a “plotting method”—he’d probably prefer to describe it as a “design method.”

Good stories, he says, come from good design. (It can certainly make them easier to write!) So Randy came up with a way to design and even write a story from a high-level, hook-type idea to a full novel in ten steps. This way, you can identify a “broken” story before you begin—and build yourself a better one.

Before you freak out because you’ve found the new-improved-easy way to plot a story, let me insert here that they’re not easy steps—step 10, for example, is to write the novel. Oy.

We’re going to take a quick look at the method so we’re all on common ground—but do note that the full Snowflake Method article adds much more detail to these steps.

Let’s start at the beginning—the idea. Sum up your idea in one sentence, preferably of less than fifteen words. No, seriously.

Don’t worry about fitting the whole story in there. Just hit the set up (or the hero or the villain) and one or two major points. Randy suggests using the one-line blurbs from the NYT Bestseller list as an example. And we will, too:

The murder of a curator at the Louvre leads to a trail of clues found in the work of Leonardo and to the discovery of a centuries-old secret society.

In step two, we take this sentence and expand it into a paragraph, with, as Randy says, “three disasters plus an ending.” One sentence per act, if you will (I guess that’d be a five-act structure).

Uh . . . okay, it’s been a couple years since I read The Da Vinci Code, but I think it might go like this:

A curator at the Louvre is murdered and his [hot] granddaughter and a [dowdy*] religious symbologist are called to investigate. They find a trail of clues pointing toward a secret society and the Holy Grail, but the police are pursuing them. Following the clues, they flee the country with the aid of the symbologist’s friend and mentor. The friend and mentor betrays them and tries to force them to reveal the location of the Holy Grail. He is arrested and they discover that the hot granddaughter is a lineal descendant of Jesus Christ—the Holy Grail.

*No offense to Hanks, but seriously, I had a short, balding professor in mind as I read. Yeah, that’s not what Brown described. So sue me.

In step three, we leave off with our plot summary and come to focus on our characters. They’re important too, you know. The major characters each get a summary page here on their motivations, goals and characteristics. (Forgive me if we don’t do that here.)

tapping pencilIn step four, we come back to our plot summary and expand each sentence from that paragraph into a paragraph of its own, making the summary roughly a page, too.

Now we’re going back to the characters—step five is to write the plot summary from the POV of each big character—and yes, the plot summary should differ among them—most especially between the hero(es) and the villain(s), but also, in, say, a romance, the hero and the heroine will have a very different perspective on events.

Really, these summaries are as much about the characters themselves—their reactions, perceptions, motivations, interpretations, etc.—as they are about the events of the novel. Major characters’ plot summaries should take a page; minors get half a page.

Guess where we’re going now? Yep, hopping back to the plot summary—now we’re going to make that one-page synopsis into a four-page synopsis. Again, it’s basically making the sentences from the last go-round into paragraphs and the paragraphs into pages.

Step seven takes us back to the characters (you knew that, didn’t you?). Now we’re making their pages into character charts (which you know I’m pretty meh about). Says Randy, the most important aspect to these charts will be to answer the question “How will this character change by the end of the novel?

For step eight we head back to our plot synopsis and make a list of scenes for the novel. The whole novel. (Now that is outlining!) In this step, we focus on just the basic facts—events, POV, locations. Step nine is along the same vein (fooled you there, didn’t I?!)—a narrative summary of each scene, with all the good dialogue and descriptions and tidbits that our doubtlessly floating around in your head now. (This step is optional, Randy says.)

As I mentioned before, step 10 is “write the novel.”

As you move through the steps, of course, you’re free (and even encouraged) to revise previous steps’ work. As always, we have to be flexible to new developments—ready to add a dining room if we find the perfect chandelier πŸ˜‰ .

So, you’re wondering, what’s with the name? The name comes from a simple fractal. You start with a triangle, then replace each straight line with a line with a peak: _/\_ . Star of David. Do it again. More complex, semi-snowflakey thing. Repeat. Even more complex snowflake.

What do you think? Could you take a story from an idea to a novel (or outline) like this? What strengths or weaknesses do you see?

Photo credits: snowflake—Julie Falk; tapping pencil—Tom St. George; fractal wrongness—the mad LOLscientist